Tuesday, October 30, 2012

Repotting Paph noid

Noid Paphiopedilum

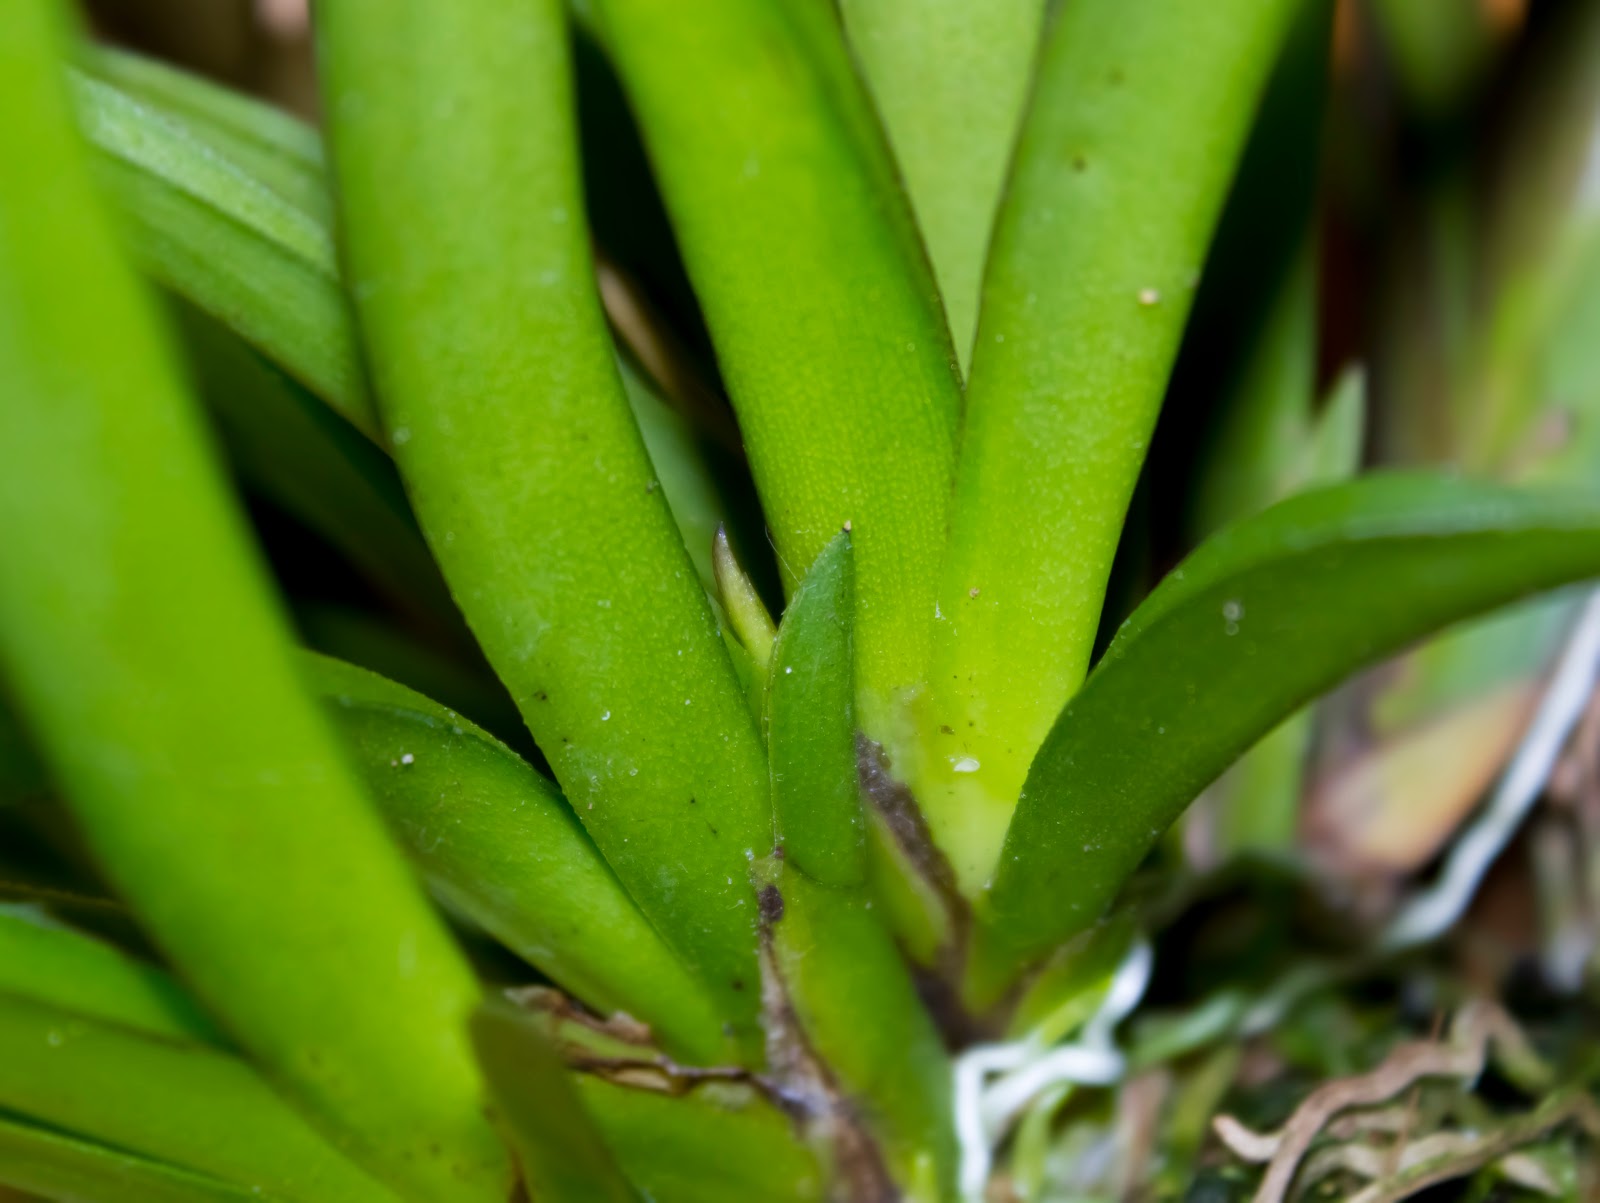
     I'm not sure what to do with my noid paph.  Last year's new growth keeps growing ever taller, and ever farther out from the media.  The stem on the growth keeps producing little root nubs which fail to grow.  Meanwhile, it keeps producing more leaves, making the whole thing ever taller and more unstable.

     My biggest worry is that if this year's newest growth appears high up on this stem, then there will be no way to bring its roots anywhere near the potting media.  

Paphiopedilum roots

     Although it hasn't been a year since the last repotting, I was a little concerned about the media taking a long time to dry between waterings.  Fortunately, all the roots were healthy.  They were also completely unchanged from last January.  I don't know what it would take to get this orchid to grow new roots into the media.


      I cleaned out the pot with a lysol wipe and a good wash, added fresh media, and put the paph back in, much as it was before.  The orchid shed one of its bottom leaves during the process (it had been only losely attached), but there is yet another new leaf growing from the crown.  To try and help promote at least a few more roots to grow from the stem, wrapped some sphagnum moss around the base, which I'll try to keep evenly moist.    

Sunday, October 28, 2012

Supplementing Paphiopedilum sanderianum with calcium

Paphiopedilum sanderianum (not yet blooming sized)

     Paph sanderianum is a calcicolous species; the term refers to plants which thrive in soil that is rich in lime.  In nature, Paph sanderianum orchids are found growing on limestone cliffs in Borneo.  Limestone is composed of different crystal forms of calcium carbonate.  In practical terms, this means that Paph sanderianum can benefit from calcium supplementation when grown at home.  

     Since the media I use for my paphs  does not contain any calcium, and New York City tap water contains rather low levels of soluble calcium, I wanted to try adding some calcium supplements. However, finding clear directions on how to do this proved difficult.  There is plenty of references to some paphs benefitting from extra calcium, and the most common method of supplementation I could find involved adding crushed limestone or oyster shell directly to the potting media.

Using crushed egg shells to supplement calcium for paphiopedilum

     Now I don't have any access to limestone or oystershells on hand, but I did have leftover egg shells, which are 95-97% Calcium carbonate crystals.  Although CaCO3 has very low solubility in water under non-acidic conditions, a little can go a long way.  

     I boiled the empty egg shells to get rid of all remaining egg whites, and peeled off the membranes covering the inside of the shells.  I then used a coffee grinder to crush the egg shells into small pieces, which I could sprinkle on top of my paph's potting media.  

     Unfortunately, I can't think of any way to make this more scientific.  I can't readily measure soluble calcium levels before or after supplementation, and with one plant, I can't attribute any changes in growth as a benefit from adding egg shells.  In addition, while writing this post, I remembered that my Paph Sanderianum had rocks in it's old media, which I had saved and mixed into fresh media when I repotted the orchid back in April.  It is very possible that those rocks are limestone gravel. To avoid accidentally overloading on the calcium, I don't plan to do this more than twice a year at most.

     In unrelated news, the Paph sanderianum is growing a new leaf.  It also has a mysterious bulge at its base which may be either a new root or a new growth, either of which would be really great news.


Friday, October 26, 2012

Remounting Tolumnia Red Berry

Tolumnia Red Berry

     Tolumnia Red Berry was my very first orchid mount.  I used a piece of driftwood that had been sold as 'aquarium decor'.  In 7 months since, the mount has started significantly decomposing.  

Closeup of decomposing mount

     The wood is now covered in algae and fungal growths.  It even grew an actualy mushroom from the bottom! (I wish I had thought to snap a picture of that before I snapped it off).  My other mounts are from a different, harder wood, and don't have anything more than a small amount of algae covering them.  Since I had an unused mount from when my now dead Den. victoriae-reginae, I decided to transfer my Tolumnia Red Berry over before its root growth made remounting more difficult.

New growth on Tolumnia Red Berry

     Peeling the orchid from its old pot was still quite easy; the new roots had not yet worked their way into the wood.  In the process, I discovered a new growth that was hiding at the back of the plant.

Freshly remounted Tolumnia

     The Tolumnia is now growing on a grapewood mount, which should hopefully fare better.  It's not as ascetically pleasing as the old mount, but the new mount is more space efficient, since I can hang it off the side of the shelves.

Wednesday, October 24, 2012

Paph Adam Hausermann x Duncan York seedlings: one thrives while the other falters

Paph (Adam Hausermann 'York' x Duncan York 'Good Show')

     When I purchased this paph cross in July, I was happy to discover that I had two separate seedlings in my pot, one slightly larger than the other.  In the 4 months since, the larger seedling has thrived, while the smaller struggles for survival. 

     Both seedlings shed one leaf each.  However the larger plant has since grown one new leaf, and is now growing another.  The smaller seedling is still struggling to push out the one new leaf it was working on when I first received it.

Paph seedling lost its roots, new root tip showing

     The reason for the disparate growth success lies in the roots.  The larger plant had two roots to begin with (while the smaller one had 1) and it grew two more roots over the last few months.  

     The smaller seedling, on the other hand, lost the one root it had.  My best guess is that the root died after snapping near the orchid's base soon after I first repotted it.  Both orchids were quite shaky in their pots due to their relative lack of root mass, and while adding supports helped stabilize both of them, I think I added them too late to help seedling #2.

     The rootless seedling does have one new root budding from its base however, so it still has a chance to survive.  I repotted it more securely back into its original pot.  The orchid will probably lose the lowest of its leaves before the new root can grow enough to support the plant.  Hopefully the other two leaves will hang on long enough for the root system to recover.

Tuesday, October 23, 2012

Second new growth on Cattlianthe Jewel Box

Cattlianthe Jewel Box 'Scheherezade'

     In addition to the nearly mature pseudobulb, and the new growth I recorded one month ago, there is a third pseudobulb that is just starting out.

First sign of new pseudobulb on cattleya

     In other less welcome news, I cut off one of the leaves, because it developed some suspicious spotting at the leaf's base.  Whatever it was, it didn't look like light damage or physical damage, and I didn't want to risk it spreading further.

Suspicious leaf damage

     None of the other leaves have similar damage, and I'll be checking regularly to make sure they stay clean.  Since I don't want to keep using the same fungicide at the risk of breeding resistant fungal strains, I ordered some physan.  This way, if I want treat a plant, I won't be using the same kind of chemical on it over and over again.

     I should probably also wipe down and disinfect my growing area.  I'm not sure when I'll get around to that though.


Sunday, October 21, 2012

First sign of flower spike on Dtps. Jungo City

Phalaenopsis spike, week 1

     The recent cooling of the temperatures must have sent "time to bloom" signals to my orchids.  In addition to Cattleya Cernua and Tolumnia Pink Panther, my Dtps. Jungo City is preparing to flower.

      This is another orchid flower spike that I managed to spot in its earliest stages. This little protrusion at the orchid's base is the start of a spike.  Two early signs differentiate it from a root: it's purple in color when every other root on this orchid emerged with a pale yellow-green tip.  And second, it's segmented.  This is really hard to see in the picture above, but became more apparent in the few days afterwards.
    
     This picture was taken on October 15.  I don't know how long the spike will take to reach maturity.  

Saturday, October 20, 2012

First sign of flower spike on Tolumnia Pink Panther

First glimpse of tolumnia flower spike (middle of picture)

     It's finally happening!  My Tolumnia Pink Panther, with its 14 mature growths and 4 new ones, is preparing to flower.  The flower spike emerges from one of the new growths from last May.  This picture is from the first day I noticed the spike (oct 18), when it was barely a quarter inch long.  However, in the two days since, it has already more than doubled in size.  

     The spike on Tolumnia Genting Orange was only a couple inches longer than this when I first purchased that orchid.  That spike took 9 weeks to mature.  At that rate, I expect Tolumnia Pink Panther to be in bloom by January.  

     Since the Tolumnia is quite large, I am also on the lookout for more spikes.  Either way, I have high expectations for these flowers... so long as I manage to keep them safe from the cat.


Friday, October 19, 2012

Roots rot on psychopsis mendenhall

Psychopsis Mendenhall 'Hildos' in spike

     Everything looks well with the Psychopsis Mendenhall on the surface.  It's leaves a large green and lush.  The pseudobulbs are full, with few wrinkles.  And its flower spike is growing.

     However, this orchid has been taking much too long (over 2 weeks) to dry out between watering.  By now, I'm learning that this is the clearest sign of trouble with my orchids.

Dead psychopsis roots

     Most of the roots that looked reasonably healthy when I first received this orchid, were now mushy and dead.  I'm not sure why.  Psychopsis are said to be really sensitive to repotting... but I did not do an actual repot when I first got the orchid (I just took the orchid out of its pot, noted the root health, and moved it to a different pot, without actually switching out the media or disturbing the roots).  I find it hard to believe that such a minimal procedure could kill off all the roots.

     Ultimately, I did a full repot this time.  I trimmed off all the dead roots (picture not taken), soaked the orchid in fungicide, and potted into a smaller 4" clear plastic pot with oncidium media.  I placed the plastic pot inside a heavier ceramic one for stability.

     I plan to get a second fungicide to use in future repottings, so that I don't foster resistance by using the same treatment repeatedly.

     The psychopsis has some new roots growing, so these will hopefully support the orchid.  I hope that the root mass can recover before it can have an impact on the flowering. 


Thursday, October 18, 2012

New orchid: Dendrobium Burana Sundae

Dendrobium Burana Sundae

     I had temporarily given up on dendrobium orchids after my two failed attempts at growing Den. victoria reginae. I think the problem with that species is that it was a cool-grower, and my apartment got too hot for it in the summer. However, I still really like how dendrobium canes look, and I've been meaning to try again with a den hybrid (which I hope to be more forgiving about its culture needs).

     A few weeks ago, user 'Leisurely' posted some beautiful photos of his dark dendrobium blooms, and I was off searching the internet for vendors selling one of these gorgeous plants.

Dendrobium Burana Sundae (Photos courtesy of 'Leisurely'): Original link
     
     I am now a proud owner of Den. Burana Sundae.  The orchid I received is larger than I had been expecting; this is certainly no miniature.  The dendrobium has 6 canes, the largest of which is 18 inches tall.  Three of the canes have leaves on them, while the other 3 are leafless.  The leaves are thick, sturdy, and 5 inches long.  One of the canes has the remnants of an old spike at its tip, so I know this orchid is big enough to bloom.

Dendrobium roots, before and after trimming

     The root health of the dendrobium is questionable.  Most of the orchid's roots (even the ones that looked greenish) were either rotten, or badly broken in many places with the velamen peeling off.  I ended up trimming off about 2/3 of the root mass.

     The orchid had a handfull of new roots (thick and white above) growing off from the newest cane, but they are actually less reassuring than they could have been.  About half their root tips are blackened and no longer growing, an appearance that reminds me of the root problems on my Oncostele Pacific Perspective.

Stubby blackened new roots tips on Oncostele Pacific Perspective (May 2012)

     Since I ended up writing off my oncidium root problems as potentially fungal in origin, I made sure to give both the new dendrobium (and the Aliceara Matthias) a good long soak in systemic fungicide before repotting.  

     Ultimately I don't know how much of a root system a dendrobium of this size needs to grow healthy.  I'm hoping that the fungicide treatment will stave off any infections that might have been present, and that good care will take care of the rest.  The dendrobium is quite top-heavy, so I potted it into a 4" ceramic pot for balance, and added a stake to support the canes.  I used 'dendrobium' orchid mix from Repotme.com.

     It's now been 1 week since I've repotted the dendrobium, and it looks like it's shedding the bottom two leaves on one of its canes.  I hope that's just the stress of shipping+repotting and nothing more sinister.   


Saturday, October 13, 2012

New orchid: Aliceara Matthias 'Glamour'

Aliceara Matthias 'Glamour'

     After my root health troubles with my existing two oncidium orchids, I wanted to buy a healthy one.  This is Aliceara Matthias 'Glamour', a red intergenic oncidium.  (A link to flowers photo)

Aliceara roots

     As far as health goes, this orchid is not much better off than my oncostele.  All the old roots on the left side of the picture are dead, although the new roots on the right are alive.  As a precaution, I soaked the orchid in fungicide before potting in the 3" slotted plastic pot seen in the picture at the top.

     The orchid has 4 mature pseudobulbs (3" tall) and one new growth.  The leaves are up to 14" long.  The orchid arrived looking fairly limp, but that's probably because it was shipped bare root.  The pseudobulbs are fairly plump, so this orchid should have plenty of reserve to adjust to my care.


Tuesday, October 9, 2012

Tolumnia Pink Panther doubles in size

Tolumnia Pink Pathner

    Back in May, I wrote about three (eventually 4) new growths on my Tolumnia Pink Panther.  In the 5 months since then, these growths have matured, and are now sending out 4 new growths of their own.  

New growth and roots on tolumnia

     The picture above shows one of the new growths, as well as the recent proliferation of roots.  The tolumnia now has 18 fans.  The orchid has quite literally doubled in size, since I first got it in April.

Tolumnia Pink Pather: 6 months growth

     The growths on the tolumnia wrap around its mount, making it difficult for a photo to truly capture its size.  Any angle I could use to take a photo would be missing at least a third of the fans.  However, compared to the photo from 6 months ago, the growth is evident.  The two pictures are at similar magnification (the size of the leaves is the same in both pictures above), but the orchid on right is much much larger, that it almost looks like a trick in perspective.

     When this orchid eventually gets around to blooming, I am expecting the show to be spectacular.


Monday, October 8, 2012

Repotting the spotted noid phal

A phalaenopsis in need of repotting

     Lately, my little noid phal has started to look like it's trying to climb out of its pot.  Several roots are growing up and out of the media, even as the pot itself takes longer than ever to dry out.  Checking my Orchid Descriptions list I realized that it has been over a year since I last repotted this orchid.  All signs indicated that it was time to switch out for fresher media.

Old (brown) and new (green) phalaenopsis roots

     When I took the orchid out of its pot, it became immediately clear why it had been showing signs of dehydration, even though the media had been taking longer than ever to dry out.

     The orchid had its two old roots sticking straight into the middle of the pot, while all the new roots had grown into a circle near the surface.  As a result, as I'd wait for the media to dry out in the center of the pot, the majority of the phal's roots would be bone dry and thirsting near the surface. 

Freshly repotted phalaenopsis

     I cleaned out the original pot, and potted the orchid back in with fresh media.  Soaking the roots in water for 15 minutes beforehand helped soften them, so I had no trouble tucking all the roots into the middle of the pot.  Now the media itself is more loosely packed, while the roots are more evenly distributed in the pot, which will help make watering more efficient.


Saturday, October 6, 2012

Potting the first of the phal keikis


Keiki orchid ready for separation from mother plant

     Phalaenopsis keikis are generally considered ready for potting once they have 2-3 leaves, and roots that are at least 3 inches long.  The roots on this 1-year old keiki are approaching 5 inches in length, and if they continued growing out any farther, then I would have struggled to find any pot to fit them.  It is time to remove the little guy from the mother plant, and pot it on its own.


Newly separated phalaenopsis keiki

     I cut the keiki from the spike with some wire cutters, sprinkled cinnamon over the cut to prevent infection, and left the keiki to soak in a tub of water for 10 minutes.  The water was treated with Superthrive, which should hopefully  encourage vigorous root growth.

potting a phal keiki

     Soaking the roots in water helped soften them so that I was able to (just barely) curl the 5-inch roots into a 3-inch clear plastic pot.  Although these roots are long, there are only two of them, and I worried that any larger of a pot would take too long to dry out.  

Newly potted phalaenopsis keiki

     The keiki is now potted in a 3" clear plastic pot, with phal bark mix.  I will now log it as a separate plant: Phal noid 'keiki 1'.

Phalaenopsis keiki

     I am trying something a little strange but possibly helpful with my second largest keiki.  Its roots are about 3" long, and I want to wait a little longer before removing it.  In an attempt to get the roots to curl into a pot-friendly shape, I tried strapping a plastic pot to the keiki while it's still attached to the spike.  This makes the spike quite top-heavy, so I added a support stake.  I'll see if this is more helpful than it is ungainly.  I expect to separate this keiki in another month.


Thursday, October 4, 2012

Flower buds on Sophronitis cernua

Sophronitis cernua

     Each of my two Sophronitis cernua orchids produced a new growth over the summer, which have now matured an opened.  One of these growths has something in the middle that looks like flower buds.

Flower bud on Sophronitis cernua

     The brownish segment on the left seems like the sheath, while the dark thing on the right seems to be a bud.  I am a little concerned by the blackish color of the bud.  It does not look very much like the macro photo of Sophronitis cernua buds here.  For now it seems to be growing, and I can only wait and see if it will bloom properly.


Tuesday, October 2, 2012

Twice-daily watering on vase-grown Angraecum leonis produced spurt of root growth

Angraecum leonis growing in vase

     About 1.5 months ago, I increased my watering of the Angcm leonis to twice daily in an attempt to simulate the monsoon season that this orchid experiences during the warm months.  My hope was that extra watering would encourage some faster growth from this very slow orchid.


New root tips on Angraecum leonis

     Within a couple weeks of the increased watering regime, the orchid activated new root growth, producing the branching seen in the picture above.  These new root branches now measure between 1/4"-1/2" long after 1.5 months growth.  I cannot conclude whether it was the extra water, or the additional exposure to Superthrive which directly caused this root growth.  

     I haven't notice any other changes in response to the twice daily watering.  Now that the weather has cooled down (and because watering an orchid twice a day is a pain the neck) I scaled my watering regimen back to once daily.

Angraecum growth progress over 1 year

     Although I complain about this orchid being the slow-poke of my collection, a comparison to my oldest photo of the plants does show a rather significant amount of root growth in the past year.  In fact, most of the roots in the December picture are themselves newly grown (they are a light green, in contrast to the darker tone of the old roots).  The truth of the matter is that the orchid arrived to me in poor health, and needs to regrow its root system before it can really start growing impressive leaves or buds.


Monday, October 1, 2012

Psychopsis Mendenhall 'Hildos' produces side spike

Psychopsis Mendenhall 'Hildos'

     Two weeks after getting mauled by my cat, this psychopsis has activated a side spike.  I may yet see blooms, if only I can keep the spike and buds and flowers away from my kitty's jaws!

Psychopsis starting a side-spike

     I've moved the orchid to as out of the way a spot as I could find (nestled between the orchid shelves, a white cabinet, the wall, and the watering bucket).  Hopefully between obstacles on every side, and a general policy of keeping cat out of the bedroom I will be able to keep this spike safe.